Microsoft’s latest product, Windows 11, is reliable and will not cause serious problems in day-to-day use. However, the keyboard is an important computer component, and it may fail to work arbitrarily occasionally. In addition, there is a history of Windows software disconnecting peripherals due to driver failure and errors. There are many methods to resolve keyboard not working issues with Windows 11, and we’ll show you how.
How To Fix Easily Windows 11 Keyboard Not Working?
The Windows 11 edition is an update from the previous version and has the same problems as Windows 10. You don’t have to engage in a war with the machine to fix the issues, and you may identify the offender by doing easy tasks. First, check that the keyboard is not defective and is in excellent working order. Then, connect the peripheral to another machine and discover its present state to double-check its status. Let me explain why keyboards don’t work correctly with Windows 11.
1 – Driver issue.
2 – USB port issue.
3 – Operating system updates.
4 – Faulty peripheral.
I’ll show you a few simple solutions before moving on to more complicated solutions for fixing the keyboard not working in Windows 11.
Restart Windows 11 PC
Do not unplug the peripheral; restart the machine to clear the existing temporary files and begin a new session. Rebooting the computer forces the software to reload the drivers, fixing the main process element.
1 – On the keyboard, press the “Start” key.
2 – Press the power button on the bottom left side.
3 – From the drop-down option, choose “Restart.”
4 – Your computer will restart.
To avoid data loss, dismiss all tabs and save the tasks. Always remember the reboot procedure when you have a non-working feature on your PC.
Secondary USB Port
Almost every Windows PC includes several USB ports in the machine, and if you do not have time to reboot or perform any other USB action, you may swap the peripheral to another USB port. A few days ago, I was in a similar predicament and solved the keyboard problem by connecting the device to another USB port. It’s a simple solution that anybody can use, and since I’d never used that USB connection before, Dell Keyboard loaded the drivers. Always connect the keyboard to another port that has not previously been used.
Uninstall Keyboard Drivers
Expensive keyboards have proprietary programs for managing, controlling, and modifying functions. Basic keyboards on the market lack this luxury and must function without a specific program. In such circumstances, you may remove its basic drivers and reconnect the keyboard to reinstall them.
1 – Unplug the keyboard from the computer.
2 – Press the “Start” key and click “Settings” to open it.
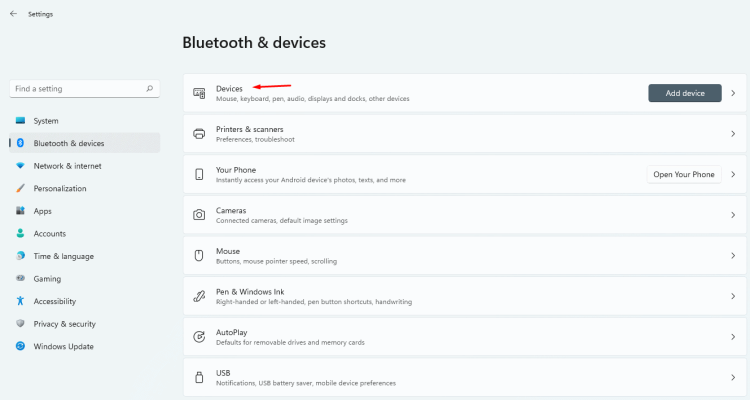
3 – Select “Bluetooth & Devices” to proceed.
4 – Select “Devices” to proceed.
5 – Under “Input,” you may find keyboard drivers.
6 – To view additional options, click the three-dot settings icon.
7 – Click the “Remove device” button.
Restart the computer and reconnect the keyboard to install the basic drivers. I could have removed the drivers using Device Manager, but performing the action through Settings is easier.
Change Value In Regedit
Keyboard issues are often caused by problems with your computer’s kernel or drivers. Therefore, only implement the solution once the peripheral condition has been confirmed before applying the solutions listed above.
1 – To get started, click the “Windows” icon.
2 – Choose “Settings” from the “Best Match” menu.
Note: If you can’t find it, type “Settings” into the upper search field.
3 – Click “Accessibility” on the left-hand side of the navigation bar.
4 – Select “Keyboard” from the “Interaction” option.
5 – Scroll down and toggle “On-screen Keyboard.”
Note: The on-screen keyboard will assist you in completing the remaining process to resolve the problem with the keyboard.
6 – Press the Windows key, next type “Run,” and press the Enter key.
Note: When you type Run in Windows, the search bar in the Windows area will appear.
7 – Type “regedit” and press enter.
Note: A new pop-up will appear in the right-hand bottom corner. In the “Open” section, type “regedit.”
8 – You will see the Registry Editor page on your screen.
9 – From the “Computer” section, choose “HKEY_LOCAL_MACHINE.”
Note: The option “HKEY_LOCAL_MACHINE” may be found on the left-hand side of the options.
10 – Select the “System” option from the “HKEY_LOCAL_MACHINE” menu.
11 – Select the “CurrentControlSet” option from the “System” menu.
12 – Select the “Services” option from the “CurrentControlSet” menu.
13 – Select the “i8042prt” option from the “Services” menu.
Note: Remember to scroll down and search until the option becomes accessible.
14 – Double-click the “Start” button.
15 – Change the value data to “1” and press “OK.”
Note: A new pop-up window titled “Edit DWORD (32-bit) Value” will appear on the screen.
16 – Be careful to change the value to “1”.
Do not be concerned about the PC’s negative effects after applying the solution since you can always reverse it by following the same guide.
The Bottom Line:
Basic keyboards are intended to work smoothly with Windows OS and include drivers with the device. You only need to install additional drivers once the manufacturer has recorded them on the official website. Regarding gaming keyboards, I propose that readers delete the proprietary program and remove the drivers. Because Windows provided the software with Microsoft Basic Drivers, basic functioning should be no problem.


