Easy steps to Block or Unsubscribe Email Addresses in Gmail: By default, Gmail uses a variety of filters that direct spam emails to the Spam folder. It helps maintain a clean and relevant Inbox folder. Despite these filters, however, many irrelevant emails may still pass through. This post will explain blocking emails on Gmail and removing unwanted spammers.
In these circumstances, you have many alternatives. You may block spam emails, unsubscribe from automated mailings, and create filters to perform the work automatically. Blocking senders on Gmail is the optimal method for preventing unwanted emails from reaching your inbox. Therefore, let’s begin immediately and walk you through the processes step-by-step.
1. Block Emails on a Computer
If you want to stop receiving emails from a particular address, blocking the sender is the obvious solution. As soon as you block an email address, you will no longer receive emails from the sender. This procedure is quite simple since it just requires a few clicks. Follow the guidelines below to complete this task:
1. You will first need to log in to your Gmail account. Then, likewise, launch Gmail and login into your account.
2. Locate the email from the sender you want to block after signing in.
3. Upon finding the email, it should be opened.
4. Click the Menu button in the upper-right corner of the email to access the menu (three dots).
5. Click on the Block “X” option from the drop-down menu. After taking this action, you will no longer receive emails from the corresponding sender. It is the easiest way to Block or Unsubscribe Email addresses in Gmail.
2. Block Emails on Your Mobile Device
If you are not near a computer or one is unavailable, you may block someone on Gmail using the Gmail app on your phone. The procedure is the same for iOS and Android. Let’s begin immediately with the step-by-step instructions:
1. Open the Gmail app on your phone to begin. If you are using an iPhone and do not have the app, you may need to download it from the Apple Store.
2. Sign into your Gmail account after the app is up and running.
3. Open the specific email from the sender you want to block by locating it and tapping on it.
4. Next, press the Menu button next to the sender’s information (three dots).
5. Select the Block “X” option from the drop-down menu. You have successfully blocked the sender at this point.
3. Unsubscribe from Automated Email Messages
At one time or another, we have all been recipients of mass emails. We all do this, whether intentionally or unintentionally. However, everyone should know how to unsubscribe from this list and cease receiving bulk mailings from a publication or business.
You may avoid having to delete these messages frequently by unsubscribing from the email list. Once you do so, you will no longer receive bulk emails from the sender. As it turns out, it is only possible to unsubscribe from bulk mailings and not a single email. In light of this, we will break this procedure into two sections so you may follow along on your computer or mobile device.
Unsubscribe through the computer
Follow the methods listed below to unsubscribe from bulk email on your computer.
1. Start by navigating to the Gmail website and logging into your account.
2. Then, open the email from which you want to unsubscribe.
3. Next to the sender’s information, you will notice the highlighted Unsubscribe option.
4. Click the Unsubscribe link to cease getting these emails.
In certain instances, the Unsubscribe option will be located after the email. If you do not see it next to the sender’s information, check towards the bottom of the email.
Unsubscribe on Your Mobile Device
Follow the procedures below to unsubscribe from bulk email on your mobile device:
1. Launch the Gmail app on your mobile device and confirm that you are logged in.
2. Open a bulk email from your Inbox after that.
3. At the bottom of the email, there is an opportunity to unsubscribe.
Follow any instructions shown on-screen to unsubscribe from the email list.
4. Develop Filters to Remove Emails
Filters are your go-to solution to remove emails that match specific criteria automatically. The solutions above do not remove any emails for you. Instead, your Gmail inbox will no longer receive emails from certain accounts. If you want to exert more control over your inbox folder, you should use filters.
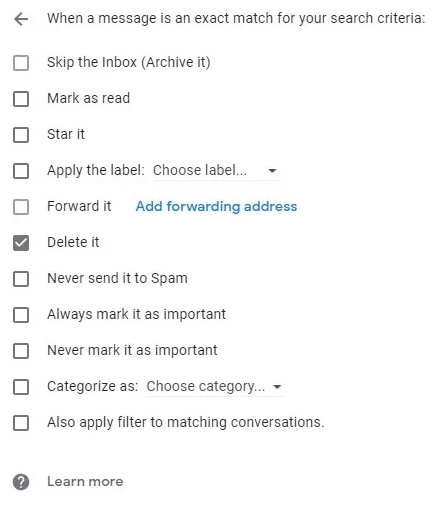
Depending on how they are configured, filters are potent. These are the rules you build to automate specific activities. For example, you can delete emails that match your criteria, designate them as critical, and perform various additional actions. Let’s investigate these choices by following the directions listed below.
1. The first step is to visit the Gmail website on your computer and log in.
2. Click the Settings (tool icon) option in the upper-right corner.
3. Click the icon labeled View all settings from the menu that displays.
4. Now, click the Filters and Blocked Addresses tab on the Settings page.
5. Click the Create a new filter option to create a new filter.
6. You will notice numerous choices on the resulting dialogue box, including Has the terms, From, and Subject, among others.
7. Complete the form according to your needs, then click the Create filter button.
8. Once you’ve done so, you’ll need to decide what to do when an email matches your filter.
9. Click the Create filter button once again to conclude. You now have a filter that automates chores on your behalf.
Final Words
Hope the above mentioned methods will work for you to block or unsubscribe email addresses in Gmail.


