Easiest Ways to Fix the HP Printer Scanner Not Working on Windows 10/11 Issue: Regarding printers, HP is one of the market’s most well-known and successful brands. The company produces some top printers and scanners today, but it does not mean the devices are without problems. However, there have been reports from some customers that the scanner that is included with their HP printer is not functioning as it should. The printer cannot carry out the order to scan documents when you attempt. Although no formal error code is generated when the failure occurs, this is irrelevant. The question of whether or not the issue can be resolved is the critical one here. And we are informing you that it is possible to Fix the HP printer scanner not working on Windows 10/11 issue with relatively little work.
How to Fix the HP Printer scanner not working on Windows 10/11?
It’s annoying when a Windows scan can’t detect your scanner while using Windows 11 or 10. For example, you can get an error that says “No scanners were detected” when scanning files or documents using the Windows Fax and Scan software. Not only does this issue occur in Windows 11, but it also happens in Windows 10.
In addition to this issue, you can also run into a different problem: the scanner stops working once you update to Windows 11. This issue is not only with HP scanners but also with competitors, like Canon, Epson, Panasonic, etc., exhibiting a similar issue with scanners.
After updating to Windows 11, you can discover your printer but not your scanner. To be more exact, you can print but not scan. The scanner is not shown in the list on the Printers & scanners page of the Settings menu.
While scanning a document, users encounter error warnings like inability to interact with the scanner, not being found, etc. Therefore, you should first check if the USB ports and the cables are working fine for USB scanners if the Internet is working OK for network scanners, or unplugging the VPN (if you use one) and check whether it helps fix the scanning issue.
In addition to a recent upgrade to Windows 11, the HP printer scanner not working on Windows 10/11 might also be caused by out-of-date or malfunctioning drivers, damaged system files, broken Windows updates due to flaws, etc.
Preliminary troubleshooting
As with any other external device, before modifying the program, it is necessary to check a few fundamental aspects. First, ensure that the scanner or the multipurpose printer is turned on. In addition, at least one status indicator light should be lighted on the printer’s control panel.
Additionally, check that the cables are correctly connected to the computer and the scanner. If the scanner is incorporated into the printer, printing a test page might confirm its operating correctly. If there is difficulty connecting to the HP Printer scanner, this post will walk you through several potential options that may help you fix the issue.
What can I do if Windows 11 does not recognize my HP Printer scanner?
1. Enable compatible Windows services
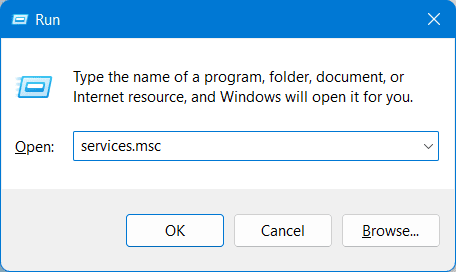
1. To launch Run Command, navigate to the Start menu, right-click, and select Run.
2. In the search box, enter services.msc and press the OK button.
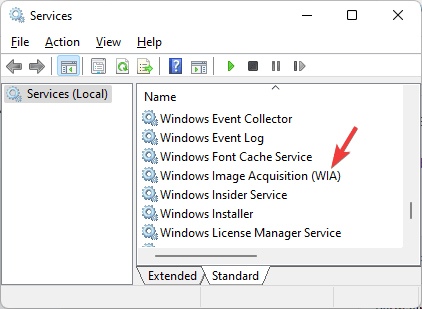
3. Under the Names column on the right side of the Service Manager window, locate the Windows Image Acquisition (WIA) service.
4. To open its Properties window, double-click on it.
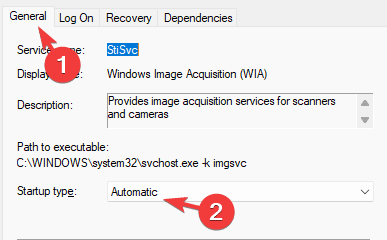
5. Under the General tab of the Properties dialogue box, locate the Startup type field. Please put it on Automatic.
6. Now, check whether the Service is operating. Otherwise, click Start.
7. To save changes and return to the Service Manager window, press Apply and OK.
8. Repeat the process for the DCOM Server Process Launcher service, Shell Hardware Detection, Remote Procedure Call, and RPC Endpoint Mapper services.
9. Close the Services window, restart your computer, and check if HP printer scanner not working on Windows 10/11 issue get fixed.
2. Run the hardware troubleshooter
1. To open Run Console, concurrently press the Win and R keys.
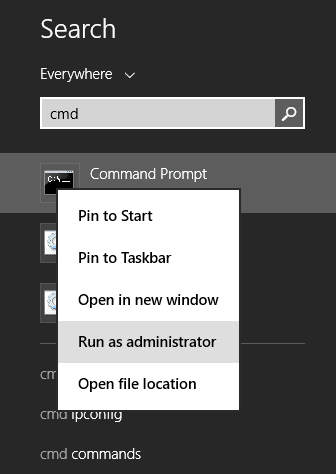
2. To launch the elevated Command Prompt, type cmd and press the Ctrl + Shift + Enter shortcut.
3. Now, in the Command Prompt (administrator) window, open the following command to run the hardware troubleshooter:
msdt.exe -id DeviceDiagnostic
4. Click on Advanced when the Hardware and Devices window appears.
5. Check the box next to Automatically apply fixes and press Next.
6. Now, wait for Windows to discover any issues. If any problems are found, it will apply the fix automatically.
7. Once the process is finished, reboot your PC. Check whether your HP printer scanner is not working issue is repaired now.
If your HP printer scanner not working on Windows 10/11 due to a glitch, a troubleshooter may be able to identify the underlying problem.
3. Update drivers
1. To update drivers manually, follow these steps:
2. First, go to Settings from Start.
3. Select Advanced settings from under Windows Update.
4. Choose Optional updates
5. Expand the Driver updates section, then checkmark the scanner drivers.
6. Reboot the machine.
If the scanner driver is out-of-date or corrupt, It is the reason your HP Printer scanner not working on Windows 10/11; thus, ensure that the drivers are always up-to-date.
You may also visit the HP Printer scanner website to download the most recent driver and install it on your computer to update the drivers. Some third-party applications can update the scanner driver for you automatically and fix HP Printer scanner not working on Windows 10/11 issue. These programs will scan your PC’s hardware and peripherals for timely driver updates. The program identifies a missing HP printer scanner driver and searches its database for critical upgrades. After locating the most recent version, the application will replace or fix the driver. It is the most efficient and straightforward method for renewing your HP printer scanner.
4. Enable compatibility mode
1. Press the Win + R shortcut key to launch the Run console.
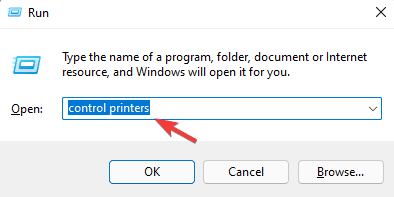
2. In the search box, enter control printers and press Enter.
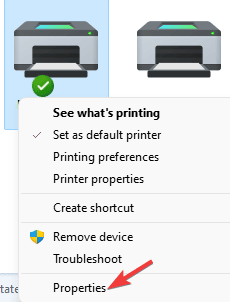
3. Right-click on the HP scanner in the Devices and Printers window and select Properties.
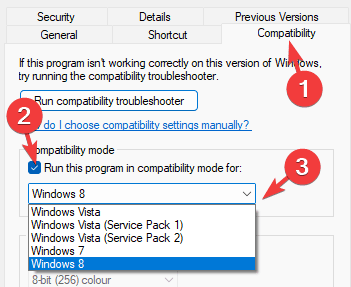
4. Select the Compatibility tab from the Properties window. Now, go to Compatibility mode and activate the option – Run this program in compatibility mode. Then, select an older version of Windows from the drop-down menu.
5. Press Apply and then OK to save changes and depart.
6. Now that you are done check if the HP printer scanner is working well.
7. Install the HP Scanner again
8. Select Device Manager by right-clicking the Start button.
9. Expand Imaging devices or Print Queues in the window for Device Manager. Right-click on the HP scanner device and select Uninstall device from the context menu.
10. When prompted with Uninstall Device, click Uninstall to confirm.
11. Once it has been entirely removed, reboot your computer.
12. Now, visit the HP scanner’s official website, and download and install the newest scanner driver.
As the scanner driver has been restored, the HPprinter scanner should function properly. Alternatively, you may run an SFC and DISM scan to detect and fix faulty system files. Additionally, if you have recently installed an update, uninstall it and see whether this resolves the HP printer scanner not working on Windows 11 issue.
FAQ
Why isn’t my HP printer scanner working?
If there are missing or out-of-date scanner drivers, your HP printer scanner may stop functioning correctly. Therefore, you need continually update your drivers up to the current, which may be done in one of two ways: Manually or automatically.
Why is my printer unable to scan to my computer?
Ensure the printer is turned on and linked to your computer, whether a desktop or a laptop. Visit the official HP website at https://support.hp.com/us-en/help/printscandoctor, download HP Print and Scan Doctor for Windows, then run the troubleshooter if that does not work.
How can I allow my HP printer to scan?
If Scan to Computer has been deactivated, you must use the HP Printer Assistant program to Enable Scan to Computer. To select this, click the Start button and then choose All Apps from the menu that appears. Next, select the printer’s name after clicking HP from the list of applications.
How can I reset the scanner on my HP printer?
Power down the HP printer scanner. After disconnecting the power cord for 30 seconds, reconnect it. Next, turn on the device while pressing and holding the Resume button for about 10 to 20 seconds or until the attention indicator light illuminates. Finally, release the Resume button, and the Attention and Ready lights should immediately begin cycling as the device restores to factory default settings.
Final Words
One of the primary causes of your HP printer scanner not working on Windows 10/11 issues is that it needs to update. The solution is easy since all you need to do is update the scanner. Several customers were able to fix the issue by adjusting the scanner’s compatibility mode. Alternatively, you may run the Hardware and Device Troubleshooter, which can automatically apply automated repairs in situations like this. These changes should fix issues with damaged files and malfunctioning drivers. This tutorial will help you repair the HP printer scanner not working on Windows 10/11 issue. If you have any more questions or suggestions, please share them in the space below. Also check how to fix printer spooler error 0x800706b9.
