Windows 11 is the latest version of Windows, and no matter how improved it is, you may face a few bugs. Numerous customers have experienced headphone issues, such as their headphones not working with Windows 11. Because Windows 11 is still in development and the public version has yet to be published, this may be a frequent issue that users of Windows 11 are facing.
How To Fix Quickly Headphones Not Working In Windows 11?
You shouldn’t be concerned if you are facing any issues, such as the headphone jack not working on Windows 11. The problem is simple to fix, and you may do so by following the instructions outlined in this article. This article will cover how to fix Windows 11 not detecting headphones.
Check For Faulty Headphones
It’s conceivable that the issue isn’t with Windows 11 but with your headphones. If you are wearing faulty headphones, you may get this error. So, first and foremost, ensure that the headphones are in working order. Whether you’re using Bluetooth headphones, connect them to your phone to test whether they work. Whether the headphones have a 3.5mm jack, try them on any device with a 3.5mm port to see whether they work.
If they still don’t work after that, the problem is with the headphones. However, if they work, check the 3.5mm jack on your PC first. First, check to see if it works. Then, connect any additional headphones to it and see whether they work. If they don’t, your PC’s headphone jack is damaged and must be replaced. However, if the headphones are working well on another Laptop/PC and there is no problem with the headphone jack, you may go to the following step.
Restart Windows 11 PC
You may try restarting your PC. Minor issues may cause problems, such as headphones not working in Windows 11. This is most often addressed by restarting your PC. You can restart the PC in safe mode and check if the issue persists. If the problem continues, proceed to the next step in the troubleshooting procedure described in this article.
Reconnect Headphones
If you’re using Bluetooth headphones, you should reconnect them. To fix the issue of Windows 11 Bluetooth not working, you may try. To reconnect your headphones to your computer, follow the steps below.
- Head to the Bluetooth & devices area on the left sidebar after opening the Settings menu on your PC.
- A list of devices will appear. Look for your Bluetooth headphones and then click the three ellipses on them. Click the Remove Device button now.
- Confirm the removal window, and your device will be uninstalled from your PC.
- After that, switch your headphones to pairing mode. Check that Bluetooth is switched on.
- Select the option to add a device. Select Bluetooth when adding a device.
- Your headphones will be shown here. Pair them by clicking them.
Once the headphones have been properly linked, try using them and check to see whether they work.
Update Windows 11
If it’s a Windows problem, it’ll be fixed by updating Windows. You may update Windows and check to see if it works.
- Press the Windows+I key combination on your PC to open Settings and update Windows.
- Head to the Windows Update tab in the settings by clicking it in the left sidebar.
- In the Windows Update section, pick Check for Updates.
- It will begin scanning for Windows 11 updates. Well, if an update is available, download and install it.
- You’ll be prompted to restart the PC after installing the update.
Try using your headphones again after following the preceding step. This should fix the problem of the headphones not working in Windows 11.
Update Audio Drivers
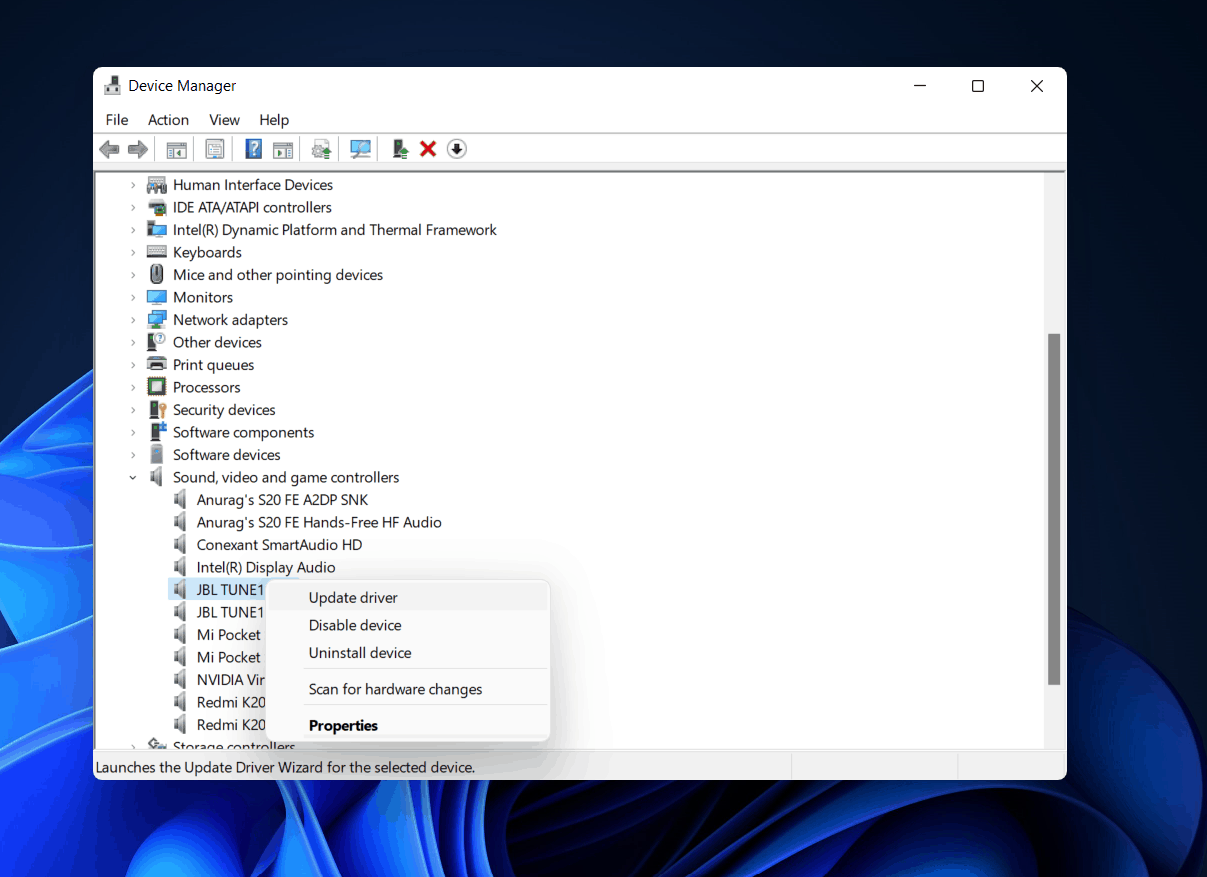
If updating Windows does not solve the problem, you might try updating the audio drivers. There are two methods to update your PC’s drivers. The first method uses a device manager to update the audio driver, while the second method uses third-party programs. Follow the instructions below to update the audio drivers using the device manager.
- Please search for the device manager in the start menu and then open it.
- This will list all the devices and hardware connected to your device.
- To enlarge it, double-click the sound, video, and game controllers.
- This will now open a list of all the input and output devices connected to your PC.
- Right-click on your headphones to choose them. Update Driver is selected.
- This will cause the driver to be updated. After that, restart your PC.
You may also update the audio drivers using third-party apps. For example, you may use apps/software like Driver Booster and DriverPack Solution to update the driver. This software will automatically look for and install driver updates on your PC. After that, restart your PC, and you should be able to use your headphones without problems.
Run Windows 11 Troubleshooter
Run the troubleshooter as a last resort to fix the issue. If none of the preceding approaches worked, try running the troubleshooter to determine the source of the problem and solve it.
- Press Windows + I to open your PC’s settings.
- When you open the settings, head to the System tab if you’re not already there.
- Next, click troubleshoot and then additional troubleshooters in the system area.
- For example, look for Playing audio and then click the run button.
- This will resolve the issue. If it does not, it will explain why.
Conclusion:
These are several solutions for fixing headphones that are not working with Windows 11. First, we hope that this post was useful in fixing the issue. Then, in the comments area below, let us know whether your issue has been resolved.


